I came across these adorable Melted Snowman Cookies during my weekly internet quest for bowling snacks.

The moment I saw them, I knew I had to make them! They are so darn cute!! Plus, they are simple and easy to make! Between work and the craziness of the holidays, I’m all about “easy-to-make!”
Let’s gather a few things from the fridge and the pantry and get started!!
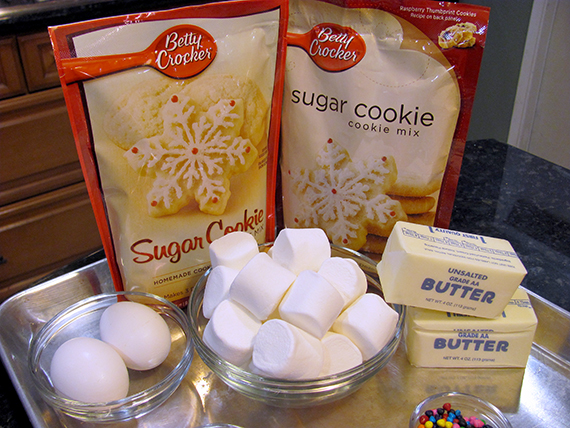
You know I didn’t even notice the cookie dough packages had two different covers on the front. Do you see how focused I was on creating these yummy cookies?! This picture shows the ingredients for TWO batches! (Y’all know I like cookies! Don’t judge!)
For ONE batch (approx 10-12 cookies), you’ll need:
1 package of Betty Crocker’s Sugar Cookie Mix
10-12 large marshmallows
your favorite white cookie icing (or use my recipe below!)
Wilton decorating tips (I used a #16 star tip from Wilton)
One batch of Alton Browns Royal Icing Recipe
and your imagination!
You can use Betty Crocker Cookie Icing for the details or make/color your own using Alton’s recipe. I used Betty’s Red, Green, and Blue! (Sorry Alton!) I also used mini orange pieces from Wilton’s Rainbow Chip Crunch sprinkles for the noses, however you can also use mini M&M’s (nose will be flat) or a bit of orange frosting!
See, simple and easy! Would I lie to you?
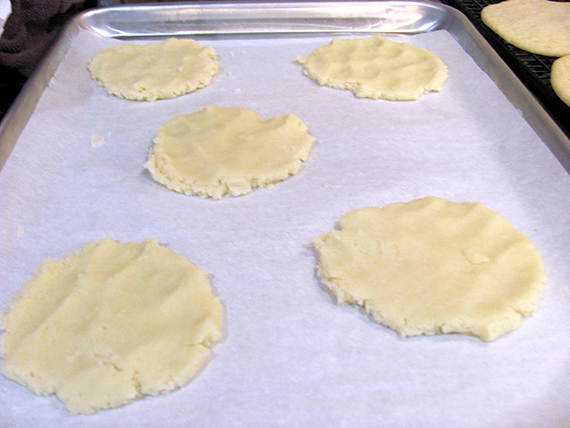
Mix the cookie mix (does that sound weird to anyone else?) together, then take a small chunk (about the size of a golf ball) and flatten to about 1/4″-1/2″ depending on how thick you like your cookies. Remember, they are supposed to be melted snowmen so the more irregular the shapes are, the better the final product will be! Isn’t that just perfect for an Imperfect Kitchen? I think I love these cookies even more now!
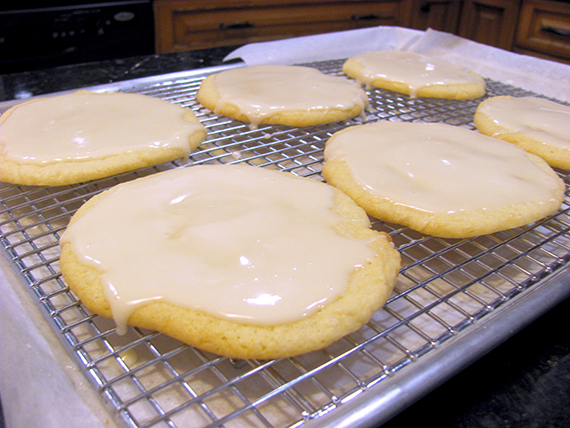
Bake the cookies according to the package directions. Pull them out when they’re done and let them cool on a rack. When they are cool, ice the cookies with an offset spatula, letting some of the icing drip over the edge for that melting effect!
Spray a microwave safe plate with cooking spray and put the marshmallows on it. Cook on high for about 15-20 seconds. Watch the marshmallows carefully, you don’t want to let them get too fluffy. Spray your hand with the cooking spray (Great tip!) and pull the marshmallows carefully off the plate and set them on the frosted cookies.
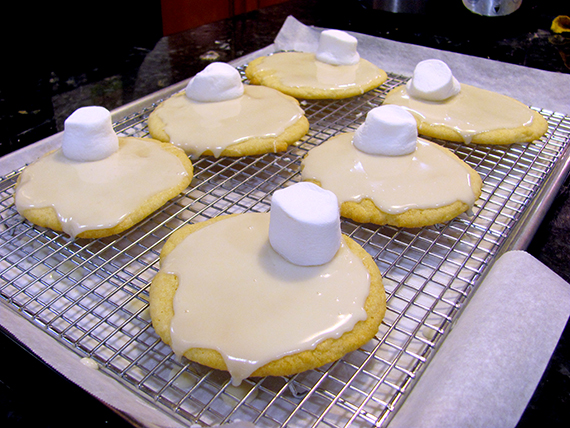
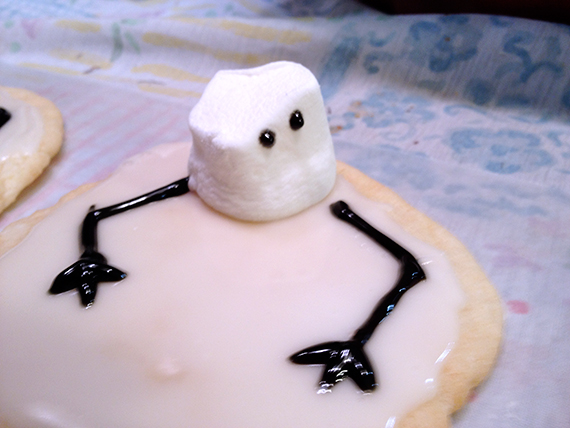
Some of my marshmallows fell over, but I just left them that way! I think it gives my cookies character. HA! They’re supposed to be Melted Snowman Cookies after all!
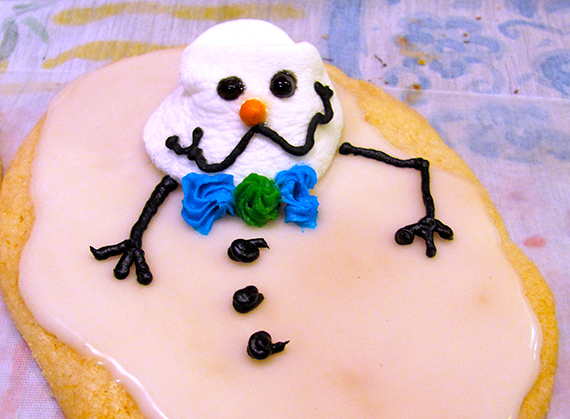
Start decorating! I found it easier to do the arms and faces first, then add the rest of the details. For the arms, eyes and mouth, I used black piping gel. It comes in a small tube and is easy to use for fine details. Plus, I like the glossy look of the gel, it adds to the melting feel, don’t you think?
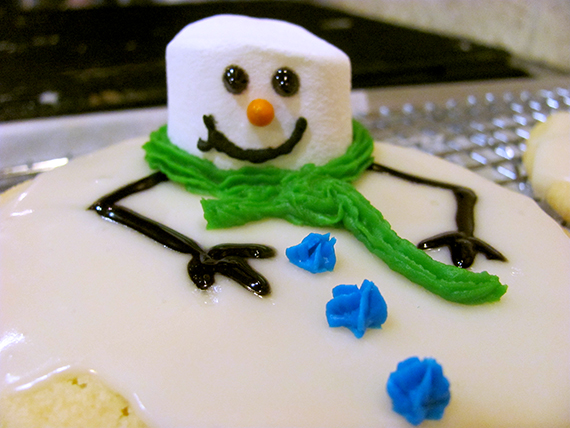
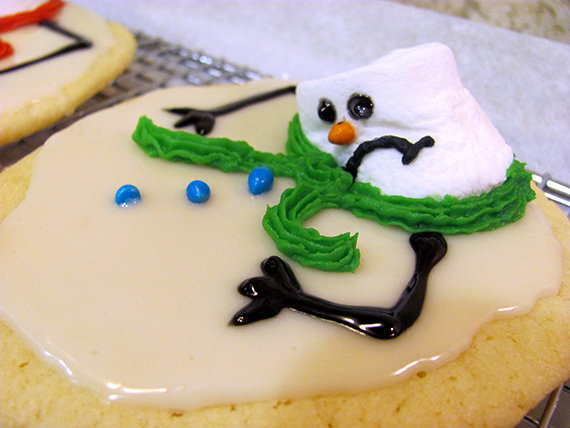
For the scarves and buttons, I used a variety of cookie frosting colors! I bought a set that came with different plastic piping tips that just screwed on to the cookie frosting tubes. (Thank you Betty Crocker, for making it easy!) however, if you don’t have those available in your supermarket, you can use a #16 star tip from Wilton and fill the frosting in your own decorating/piping bags. The #16 tip is nearly the same size and will give you the same look.
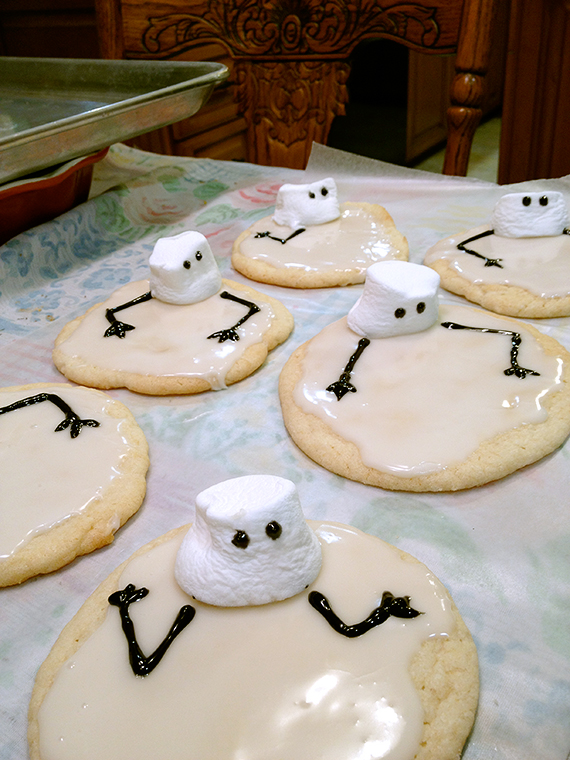
Aren’t they cute?
Ahhhh… I’m melting….
What? It’s going to get how hot?
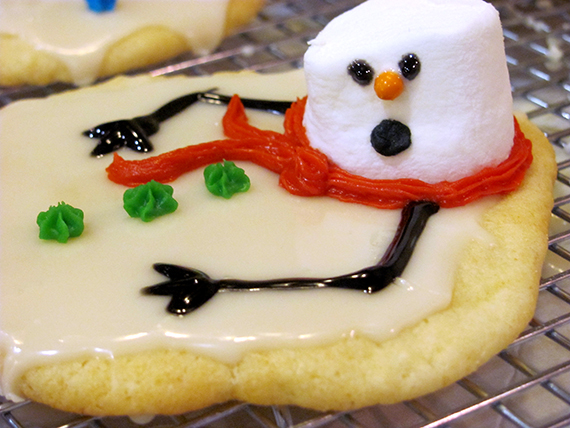
For those noses, I used Wilton’s Rainbow Chip Crunch Sprinkles. It comes in a container with lots of colors and I simply picked out the orange ones. They have odd little shapes and I liked the character they brought to the cookies. You can see I used a few of the other colors to make buttons too!
All together now!
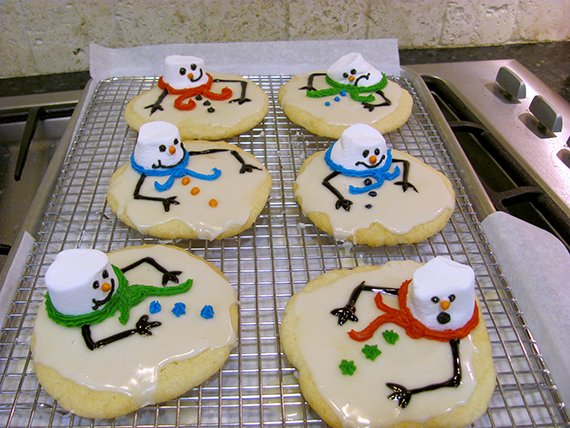
I love, love, love these cookies! The only thing I would have changed, is my icing recipe. I didn’t have clear vanilla extract when I made them, so my cookies aren’t as bright white as they should have been. It would have made them even more adorable. When you do yours, get the clear vanilla extract or use white cookie icing! Some readers even suggested using peppermint extract or almond extract to flavor the icing! Great ideas!!
You really should try these! They are fun to make and fun to eat too! I had a blast making them and will probably be making them again before the season is over. Make these as a family project on a cold night and you’ve got a perfectly sweet evening! Enjoy!
Melted Snowman Cookies
These cookies are made with packaged cookie mix and store bought icing. Feel free to use your favorite sugar cookie recipe and decorations to make them uniquely your own!
- 1 pouch of Sugar Cookie Cookie Mix, plus ingredients on the package to make the dough
- 10-12 large marshmallows
- Black decorating gel
- Cookie Icing
- Wilton decorating tips (I used a #16 star tip from Wilton)
- Royal Icing - store bought or make your own
- Your imagination!
Prepare the cookie mix as directed on the package.
Take a small chunk (about the size of a golf ball) and flatten to about 1/4"-1/2" depending on how thick you like your cookies. Remember, they are supposed to be melted snowmen so the more irregular the shapes are, the better the final product will look.
Bake the cookies according to the package directions. Allow the cookies to cook completely on a wire rack before decorating.
While the cookies are baking, make the royal icing. When cookies are cool spread some of the royal icing over the tops using an offset spatula. Allow the icing to drip over the edges of the cookie for that melting effect. Let the icing harden at room temperature for about 10 minutes before moving on.
While the icing is drying, spray a microwave safe plate with cooking spray and put the marshmallows on it. Cook on high for about 15-20 seconds. Watch the marshmallows carefully, you don't want to let them get too fluffy. The marshmallows will stick to the plate so spray your hand with non-stick cooking spray and pull the marshmallows carefully off the plate. Set one marshmallow on each of the frosted cookies.
Some of my marshmallows fell over, but I just left them that way! I think it gives my cookies character. HA!
Start decorating! I found it easier to do the arms and faces first, then add the rest of the details. For the arms, eyes and mouth, I used black piping gel. It comes in a small tube and is easy to use for fine details. Plus, I like the glossy look of the gel, it adds to the melting feel, don't you think?
For the scarves and buttons, I used a variety of cookie frosting colors! I bought a set that came with different plastic piping tips that just screwed on to the cookie frosting tubes. (Thank you Betty Crocker, for making it easy!) however, if you don't have those available in your supermarket, you can use a #16 star tip from Wilton and fill the frosting in your own decorating/piping bags. The #16 tip is nearly the same size and will give you the same look. For those noses, I used Wilton's Rainbow Chip Crunch Sprinkles. It comes in a container with lots of colors and I simply picked out the orange ones. They have odd little shapes and I liked the character they brought to the cookies. You can see I used a few of the other colors to make buttons too!
I understand some people are having difficulty printing this recipe, so here is a link to the Google Doc that will work until I can get the page fixed! Thank you for your understanding and patience!
PRINTABLE MELTED SNOWMAN COOKIE RECIPE
Products I used for this recipe:
Half Sheet Pan with Cooling Rack


Wilton Disposable 12″ Decorating Bags


Do you have this recipe in printable form anywhere? Thought my school cooking class might like to do this.
Hi Barbara! Thank you for asking! My recipe plug in doesn’t seem to want to share a printable version, but here is a google doc with the recipe. Please let me know if you can print it! Have fun!
https://docs.google.com/document/d/1GUTdX75sDrvn3Wg6YOTekA99zeHwDKq1IhSqx2t1lHo/edit?usp=sharing
Why not post that link at the top of the page and make it very prominent?
Hi Jason! Thank you for the suggestion. The link to the printable version is there below the recipe. :-)
Can you share your icing recipe? I couldn’t fine it on the page. Thanks!
I don’t have a microwave. Any suggestions how to deflate the marshmallows?
Hi Linda. You can put them on a lined baking tray and out them in the oven at 350 for a few minutes. Just watch them carefully!
Thank you so much for such easy recipes. Some I remember using when my children were small. Keep sending!!!!!
Great idea! Will make these with my grandchildren. Thanks.
I still don”t see the icing recipe
Hi Ruthann! It’s in the post up near the top, but here’s the direct link: Alton Brown Royal Icing
I don’t see your recipe for the icing.
Hi Alexandra! It’s there, it’s up at the beginning of the post. Here’s the link for it: Alton Brown Royal Icing
I can not find your recipe for the icing :( Can you please post it :)
Hi Britney! I’m on it! I didn’t realize there was a problem. Should be up soon!! Thank you for your patience!
I need the icing recipe for the melted snowman cookies.
Here you go! Royal Icing via Alton Brown
Hello, I still do not see you icing recipe, I may be missing it but have re looked 3 times?
Hello Mary! It’s here, linked near the beginning. Here’s the direct link for you: Alton Brown Royal Icing
I don’t see the icing recipe for the melted snowman they are so cute …
Hello Rosalie! It’s there, but apparently it’s hiding from people. Here’s a direct link for you: Alton Brown Royal Icing
I can’t see the icing recipe either
Hello Lisa! Here it is: Alton Brown Royal Icing